Creating and Managing Provisioning Policies
Overview
Provisioning Policies in EmpowerID are a foundational part of the identity lifecycle, designed to automate the granting of birthright access. Birthright access refers to the predefined resources and permissions a user should receive automatically when they join the organization, based on attributes like role, department, or location. Provisioning policies streamline onboarding, manage access during role changes, and ensure accounts are deprovisioned when users leave the organization.
These policies—often called "resource entitlements" or RETs — define how and when to create, move, disable, or deprovision resources such as Active Directory (AD) accounts, Exchange mailboxes, SAP accounts, and others. They operate based on RBAC actor assignments, which may include business roles and locations, management roles, groups, query-based collections, or individuals.
Key Components of Provisioning Policies
- Target Object Type: The type of account or resource being provisioned, e.g., AD account, Exchange mailbox, SharePoint profile, etc.
- Provisioning Scope: Defines the RBAC actor (e.g., BRL or management role) that triggers the entitlement.
- Priority: Used to resolve conflicts when a person qualifies for multiple policies targeting the same resource type.
- OU Mapping and Creation Path: Determines the directory location where the resource is created. This may follow business location mappings or be explicitly defined.
Processing Mechanism
EmpowerID provisioning policies rely on a two-step processing system to evaluate and enforce entitlement rules. This mechanism ensures that resource assignments—such as creating, moving, or revoking accounts—are systematically calculated and executed across all applicable systems.
The process begins with the Resource Entitlement Recalculation Job. This job runs on a scheduled basis and scans all defined provisioning policies to determine:
- Who now qualifies for a new entitlement and should be provisioned.
- Who no longer qualifies and should be deprovisioned.
For each user-resource relationship identified, the recalculation job generates a record and places it into the Resource Entitlement Inbox. This inbox serves as a holding queue that tracks all provisioning events awaiting action.
Next, the Resource Entitlement Inbox Processor Job takes over. This job processes each inbox item and carries out the necessary action—whether that’s provisioning a new resource, moving an existing one, disabling it, or fully deprovisioning it based on the policy configuration.
Administrators can monitor and interact with the Resource Entitlement Inbox directly. The inbox interface allows filtering by entitlement type (e.g., AD account, SAP account), status (e.g., pending, approved), and action type (e.g., grant, revoke). There are dedicated tabs for pending approval items, approved or rejected batches, and errored entries that failed during execution.
EmpowerID also supports throttling of provisioning and deprovisioning operations. Administrators can configure thresholds to prevent large-scale automatic changes. For example, if the recalculation job determines that more than 100 accounts should be deprovisioned in a single run, the batch will be suspended and flagged for manual review. Admins can then approve or reject each item individually or as a group.
Additionally, administrators can enforce approval requirements for all provisioning and/or deprovisioning operations, making the system more conservative when handling sensitive environments.
This job-driven, inbox-backed architecture gives EmpowerID both the automation power to handle massive identity lifecycle events and the control needed for secure governance and compliance.
Creating and Assigning a Provisioning Policy
Creating a provisioning policy in EmpowerID involves configuring several elements that define how accounts are provisioned and what actions are taken as a user moves through their lifecycle. Once defined, the policy must then be assigned to the appropriate RBAC actors in the organization to take effect.
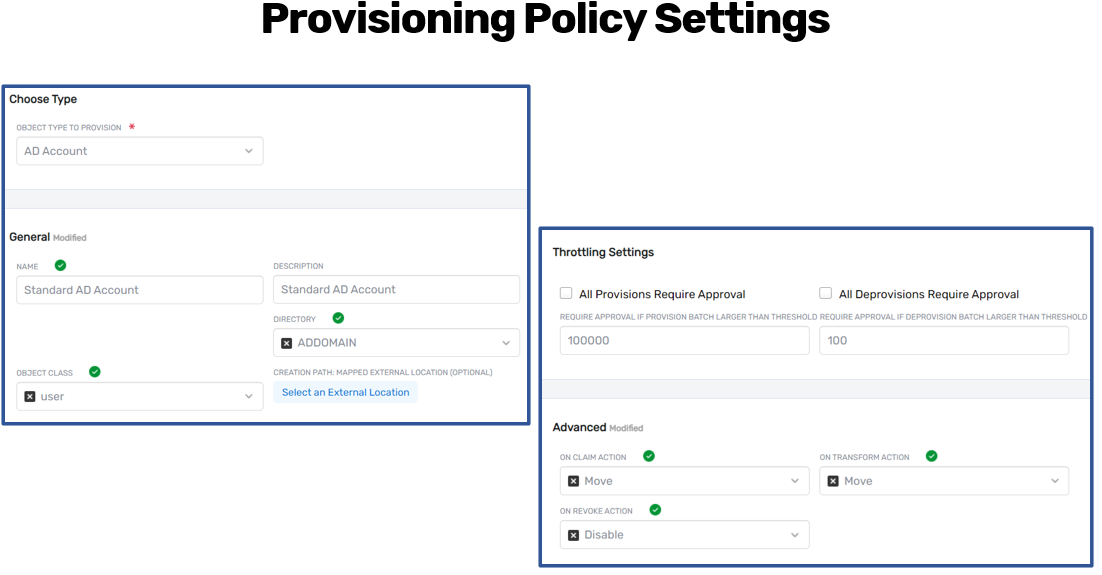
To create a provisioning policy, begin by selecting the object type to be provisioned. This can include Active Directory accounts, Exchange mailboxes, Office 365 accounts, SharePoint profiles, or any other supported or custom account store types. EmpowerID offers a dropdown list of available object types, including custom account types defined in the system.
Next, select the directory or system where the account will be provisioned. For example, when provisioning Active Directory accounts, the directory selection will be filtered to show only Active Directory security boundaries. The object class is typically set to user, but may vary depending on the target system (e.g., inetOrgPerson for LDAP).
The creation path determines where in the external system the account should be created. If this field is left blank, EmpowerID will use the OU mappings defined between EmpowerID locations and the external system's structure. This is common in Active Directory environments, where business locations are mapped to specific OUs. If an explicit creation path is required, administrators can browse the directory tree and select a specific location.
EmpowerID also supports advanced creation path logic using custom resolvers. This allows administrators to define assemblies that evaluate business logic (e.g., department, region, job role) and dynamically calculate the appropriate provisioning location.
The claim, transform, and revoke actions define how EmpowerID should manage accounts throughout the user’s lifecycle:
- Claim Action: Triggered when a user enters the scope of the policy for the first time. Administrators can choose to create a new account, move an existing one, enable a disabled account, or run a custom workflow.
- Transform Action: Occurs when a user transitions from one policy to another managing the same resource type (e.g., moving from US Sales to EMEA Engineering). EmpowerID can move the account or perform other actions instead of revoking and reprovisioning.
- Revoke Action: Initiated when a user exits the scope of all applicable policies for that resource. Options include disabling, moving, or fully deprovisioning the account.
Throttling and approval settings can also be configured at this stage. Administrators may require manual approval for all provisioning and deprovisioning tasks or set numeric thresholds that, if exceeded, suspend the batch for review.
Once the provisioning policy is created, it is not active until it has been assigned or scoped to an RBAC actor. Assignments can be made to any of the following:
- Business Role and Location (e.g., all employee roles in investment banking)
- Management Role (e.g., IT Admins or HR Managers)
- Group membership
- Query-Based Collection (e.g., users matching specific attributes)
- Specific Person

Assignments can be made to an actor directly or to a node in the RBAC hierarchy tree, enabling inheritance by child roles and locations. EmpowerID also supports cross-system entitlements—for example, assigning an AD provisioning policy based on a user's group membership in an SAP system.
Once the policy is saved and assigned, the Resource Entitlement Recalculation Job will detect the new configuration, calculate which users fall within scope, and create provisioning records accordingly. These will then appear in the Resource Entitlement Inbox for processing by the Inbox Processor Job.
Monitoring and Auditing Provisioning Policies
EmpowerID provides a comprehensive set of tools for administrators to monitor and audit provisioning policy activity and inheritance. These capabilities allow for both real-time oversight and retrospective analysis of how provisioning policies are configured, assigned, and executed.
One of the primary tools for monitoring provisioning activity is the Resource Entitlement Inbox. This interface provides visibility into all provisioning events, whether they are pending approval, approved, denied, or failed. The inbox is organized with filters and tabs to help administrators quickly navigate to:
- Pending Approval: Items that require administrative review before processing.
- Pending Batches: Groups of provisioning or deprovisioning actions suspended due to throttling rules.
- Approved/Rejected: Historical logs of actions that have been reviewed.
- Errored Items: Failed provisioning attempts with error messages for troubleshooting.
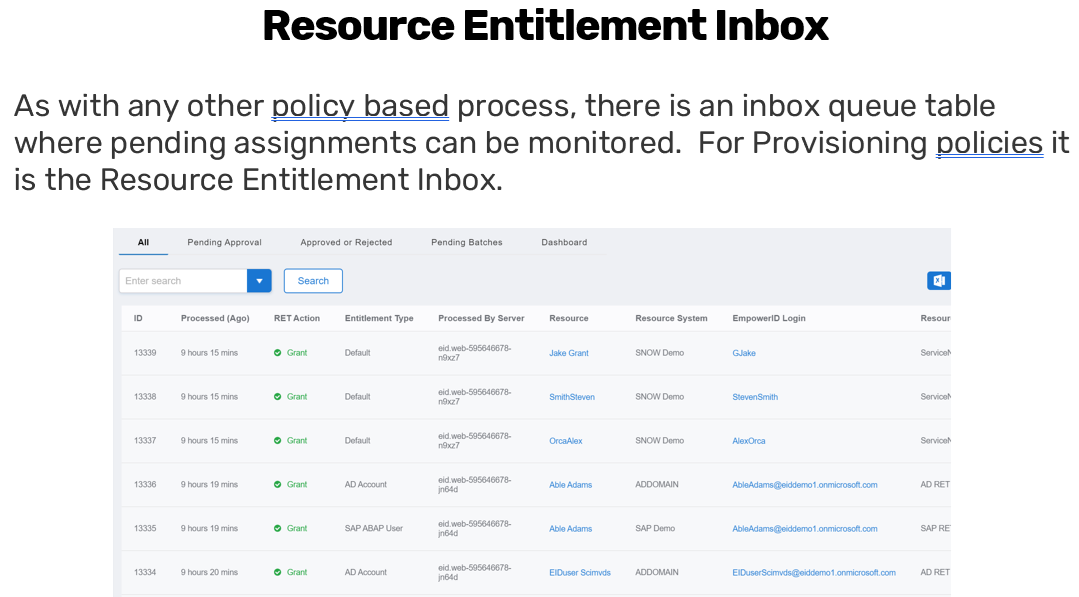
Each record in the inbox includes details such as the entitlement type (e.g., Active Directory account, SAP account), the associated resource system, the action being taken (grant or revoke), and any errors encountered during processing. Administrators can approve entire batches or selectively approve or reject individual records.
In addition to inbox monitoring, EmpowerID allows auditing of provisioning policy assignments and inheritance. For any Person object or Business Role and Location (BRL), administrators can view all provisioning policies that apply to that identity—both directly assigned and inherited from parent nodes in the RBAC hierarchy. This view also displays the priority of each policy assignment, which determines which policy takes precedence in cases of conflict.
The Provisioning Policies view provides a centralized interface for managing all policies within the environment. Administrators can see which policies exist, what object types they provision, their assigned directories, and whether they are actively scoped to any RBAC actors. From this interface, policies can be edited, deleted, or assigned as needed.
Administrators can also leverage visual inheritance tools to trace how provisioning policies flow through the organizational structure. By selecting nodes in the business role and location tree, it is possible to identify inherited provisioning assignments and evaluate the impact of changes before they are made.
Finally, data from the inbox and assignment views can be exported for offline reporting. This enables organizations to conduct audits, generate compliance reports, and support governance initiatives using tools like Excel or Power BI.
These built-in auditing and monitoring features ensure transparency and accountability in how provisioning policies are applied across the enterprise.
Creating a Provisioning Policy in EmpowerID
This walkthrough demonstrates how to create a provisioning policy in EmpowerID to automate the creation, management, and deprovisioning of resources such as Active Directory accounts.
-
Navigate to Provisioning Policies
In the EmpowerID Web interface, go to Identity Lifecycle > Provisioning Policies.
This opens the management view showing all existing provisioning policies. -
Create a New Policy
Click the + (plus) icon to start creating a new policy.
The Object Type to Provision field will default to “Active Directory Account.” You can choose from a wide list including Exchange mailboxes, SharePoint profiles, Office 365 accounts, or any custom account types. -
Define the Policy
- Name the policy (e.g.,
AD Domain Account). - Directory: Select the target directory or account store (e.g., your Active Directory domain).
- Object Class: For AD, this is typically
user.
- Name the policy (e.g.,
-
Set the Creation Path
- Leave the creation path blank to use the default location mappings between EmpowerID locations and directory OUs.
- Alternatively, use the Browse or Search functions to select a specific OU where accounts should be provisioned.
-
(Optional) Configure a Custom Resolver
If advanced logic is needed to dynamically determine provisioning locations, specify a custom creation path resolver assembly. -
Define Lifecycle Actions
- Claim Action: Choose from options like
Move,Enable,Move and Enable, orRun Workflow. - Transform Action: Typically set to
Moveto reflect the user’s new organizational position. - Revoke Action: Choose from
Disable,Disable and Move,Deprovision, orDelete.
- Claim Action: Choose from options like
-
Configure Throttling (Optional)
- To limit mass provisioning/deprovisioning, set thresholds (e.g., a deprovisioning cap of 100 accounts per job cycle).
- You may also enforce that all provisioning/deprovisioning requires approval.
-
Save the Policy
Once the core configuration is complete, click Save.
At this point, the policy is created but not yet active—it must be assigned. -
Assign the Policy
- Open the policy from the list and navigate to the Assignees section.
- Choose one or more RBAC actors:
- Business Role and Location
- Management Role
- Group
- Query-Based Collection
- Individual Person
- Example: Assign the policy to
All Employee Roles in All Business Locations.
-
Set Assignment Priority
- If multiple policies apply to the same user and resource, EmpowerID uses priority values to determine which one wins.
- Lower numbers have higher priority (e.g., 10 has precedence over 100).
- Set the priority accordingly and save the assignment.
-
Monitor Policy Execution
- The Resource Entitlement Recalculation Job will detect the new policy and place entitlement records into the Resource Entitlement Inbox.
- The Inbox Processor Job will act on these records and begin provisioning accounts as defined.